

Quick Answer: What Does an AC Contactor Do?
An AC contactor is an electrically controlled switch that uses a coil-driven electromagnet to make and break a power circuit on command, and it is built to do that thousands to millions of times without the contacts welding or wearing out. It switches load current when told to. It does not protect the circuit. Sizing it correctly means sizing it against the rating that applies to your actual load duty, not the highest number printed on the label.
A contactor marked 20 A is not a 20 A device for a motor. The same physical unit may be rated 20 A for a resistive heater and 9 A for a squirrel-cage motor, because motor inrush and inductive breaking punish the contacts far harder than a heater does. That single distinction causes more early contactor failures than any other selection error.
This guide covers what the contactor must carry, how to calculate it, which utilization category applies, and the pole, coil, auxiliary, life, and coordination checks that follow the ampere figure.
Match the Switching Job to the Right Device
Before sizing anything, confirm that a contactor is the correct device for the job. Panel designs frequently fail because one component is expected to perform two unrelated functions.
| อุปกรณ์ | Primary job | Switching frequency | Trips on fault |
|---|---|---|---|
| AC contactor | Make and break load current on command | Designed for frequent cycling | No. Requires a separate overload relay or breaker |
| General-purpose relay | Low-power switching and signal control | Rated for lighter duty | No |
| MCB or MCCB | Overcurrent and short-circuit protection | Occasional operation, not routine cycling | Yes |
| Motor starter | Contactor and overload relay in one assembly | Same as contactor | Yes, through the overload relay |
| Soft starter or VFD | Controlled ramp of motor current | Continuous control rather than on/off | Varies by model |
If the question is how to switch a load on and off repeatedly on command, the answer is a contactor. If the question is what protects the circuit from overload, that is a different device. Treating the contactor as if it does both is one of the most common panel-design mistakes.
Why a Relay or a Breaker Cannot Take Its Place
A general-purpose relay can close a circuit, but it is not built to do so at motor or heater current levels over the long run. Contactors are rated for mechanical life in the millions of operations, while general-purpose relays are rated for a small fraction of that under real electrical load. The difference lies in contact material, spring force, and arc suppression. Contactors use the contact geometry and, on larger frames, the arc chutes needed to break inductive motor current repeatedly without the contacts pitting or welding. A relay pushed into that duty usually fails by welding closed under load, which is a far worse failure mode than a contactor’s gradual wear.
A circuit breaker is designed to protect a circuit and to be operated occasionally, not to be cycled as part of normal automation logic. Using a breaker as a duty switch shortens its protective life and is not what it is rated for. The contactor and the protective device do two different jobs and belong in the same circuit together.
How an AC Contactor Works
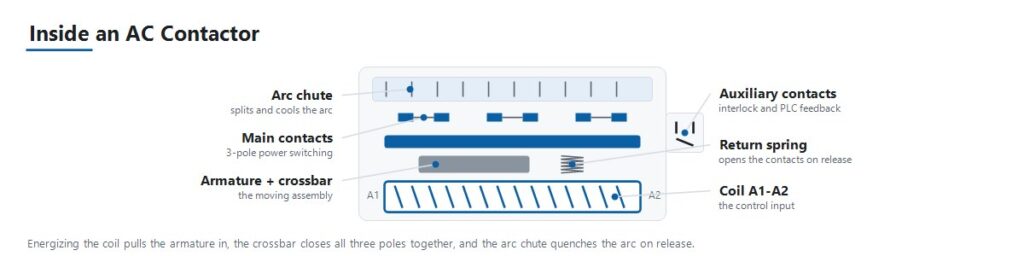
The operating sequence explains most of the failure modes covered later in this guide.
- The control signal energizes the coil. A control circuit, such as a PLC output, thermostat, or pushbutton logic, applies voltage to the coil at its rated coil voltage.
- The electromagnet pulls in the armature. The energized coil creates a magnetic field that draws a moving armature toward a fixed core.
- The main contacts close. The armature’s motion closes the main power contacts through a common crossbar, connecting the load to the supply.
- The auxiliary contacts change state. Small auxiliary contacts linked to the same armature open or close in step with the main contacts. They provide interlocking, indication, and confirmation to a PLC that the contactor actually closed.
- Spring force holds contact pressure. Stable contact pressure under vibration and load is what prevents contact bounce and resistive heating at the contact face.
- De-energizing the coil opens the circuit. When the control signal drops, the magnetic field collapses and a return spring pulls the armature back, opening the main contacts.
- Arc suppression handles the interruption. Opening a circuit under load, especially an inductive motor load, draws an arc across the separating contacts. Contact geometry and arc chutes extinguish that arc quickly enough to prevent damage on every cycle.
Utilization Categories Decide the Real Current Rating
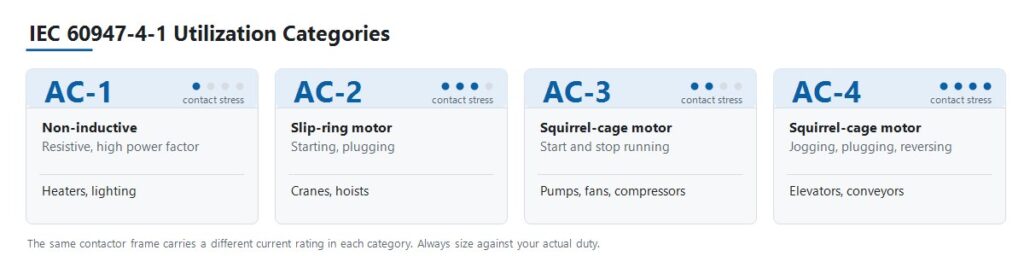
IEC 60947-4-1 defines utilization categories that describe how hard a load is on the contacts, not simply how many amperes it draws. This is the step most selection errors trace back to.
| ประเภท | Load type | ลักษณะการสับสวิตช์ | Typical application |
|---|---|---|---|
| AC-1 | Non-inductive or slightly inductive, high power factor | No significant inrush | Resistive heaters, HVAC heating banks, general lighting |
| AC-2 | Slip-ring (wound-rotor) motors | Starting and plugging under load | Cranes, hoists |
| AC-3 | Squirrel-cage motors | Starting, and switching off a running motor | Pumps, fans, compressors |
| AC-4 | Squirrel-cage motors | Jogging, plugging, rapid reversing | Elevators, conveyors, machine tools |
The consequence is that a single contactor carries several different current ratings. A JUTRION JRC1-D09 is rated 20 A in category AC-1 and 9 A in category AC-3. Both figures describe the same physical device. Sizing a pump against the 20 A number puts the contactor at more than twice its motor-duty rating, and the contacts will show it.
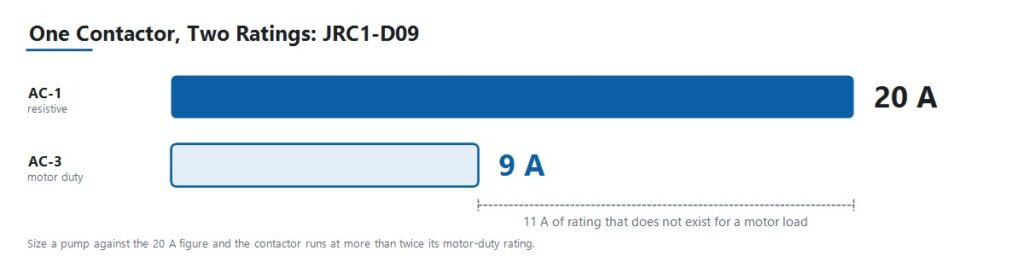
Read every published rating together with the category it belongs to. A frame is not a crane model or a jogging model. It is one frame with several ratings, and the duty decides which rating applies to the project.
Convert the Motor Data into Amps
Use a verified full-load current directly when the project already provides one. When the data is given as motor power, convert it using the correct voltage and phase arrangement.
Three-Phase Motors
I = P × 1,000 / (√3 × VLL × cos φ × η)
Single-Phase Loads
I = P × 1,000 / (V × cos φ × η)
Here, I is line current in amperes, P is motor rated output power in kW, VLL is three-phase line-to-line voltage, V is single-phase voltage, cos φ is power factor, and η is efficiency.
Power factor for standard induction motors typically falls between 0.80 and 0.88, and efficiency between 0.85 and 0.93 depending on efficiency class. Use the nameplate values whenever they are available. The typical ranges are for preliminary work before the motor datasheet arrives.
For purely resistive single-phase loads such as heating elements, power factor and efficiency are effectively unity, and the expression reduces to I = P × 1,000 / V.
ประเภท JUTRION AC contactor sizing calculator performs the same calculation and returns a minimum AC-3 operational current. It is a starting point for the specification, not a substitute for the motor nameplate or the manufacturer’s rating tables.
Apply the Load-Type Multipliers and Ambient Derating
Certain loads draw far more than their steady-state current at the moment of switching. Long-standing industry practice applies a multiplier to account for that behaviour. These conventions are not values defined in IEC 60947-4-1, so treat them as a first pass and confirm them against actual inrush data for critical or large circuits.
| Load type | Conventional multiplier | Reason |
|---|---|---|
| Capacitor banks | Approximately 1.5 × capacitor rated current | Capacitive inrush at switch-on is severe and very short |
| Transformers and welding sets | Approximately 2 × rated current | Magnetizing inrush can reach many times steady-state current |
| Gas-discharge and HID lighting | Approximately 1.1 to 1.4 × rated current | Ballast inrush and warm-up behaviour |
| Poor cooling or densely packed enclosure | 110 to 120 percent of load rated current | Elevated internal temperature reduces current capacity |
| Continuously running motor, long duty | Contactor rated current reduced by approximately 30 percent | Sustained thermal loading of the contacts |
Ambient Temperature and Enclosure Conditions
A contactor’s rated current assumes the reference ambient temperature stated on its datasheet. Above that temperature, current-carrying capacity falls, but the derating slope is specific to the manufacturer and the frame. Use the derating curve from the actual product documentation rather than a generic percentage.
Two conditions apply regardless of product. First, base the calculation on the temperature inside the enclosure, not the room. A densely packed panel in a warm plant runs considerably hotter than ambient. Second, contactors mounted side by side with no spacing heat one another, so respect the manufacturer’s minimum spacing or derate further.
A Worked Example: 4 kW Pump Motor at 400 V
A three-phase centrifugal pump motor in an OEM water-treatment panel. Standard start and stop duty, approximately 20 starts per hour, panel ambient around 35 °C.
Step 1. Establish the utilization category. A squirrel-cage induction motor, started and stopped normally, is category AC-3. It is not AC-1, even though the load is described as a simple pump.
Step 2. Calculate full-load current. Nameplate values are 4 kW, 400 V, cos φ = 0.85, η = 0.90.
I = 4 × 1,000 / (1.732 × 400 × 0.85 × 0.90)
Working the denominator: 1.732 × 400 = 692.8, then × 0.85 = 588.9, then × 0.90 = 530.0.
I = 4,000 / 530.0 ≈ 7.6 A
Step 3. Select against the AC-3 rating. The requirement is a contactor whose AC-3 rating covers 7.6 A with margin. The JRC1-D09 is rated 9 A at AC-3, giving approximately 18 percent headroom over the calculated full-load current. Note what was not done: the same JRC1-D09 carries a 20 A AC-1 rating, and sizing this pump against that figure would have been the single most common contactor selection error.
Step 4. Check ambient and duty. At 35 °C panel ambient with 18 percent headroom, verify the figure against the product’s derating curve before committing. That margin is comfortable in a well-ventilated panel and tighter in a densely packed one. At 20 starts per hour, confirm that the rated operations per hour and the AC-3 electrical life comfortably exceed the expected duty across the panel’s service life.
Step 5. Specify coil voltage. The panel’s control transformer secondary is 220 V AC, so the coil is specified at 220 V. It is not 400 V, even though the motor runs at 400 V.
Step 6. Add protection. Pair the contactor with a correctly sized overload relay set to the motor’s full-load current, and confirm Type 1 or Type 2 coordination with the upstream breaker or fuse. A normal start under 10 seconds points to a Class 10 trip class here. The overload relay setting calculator converts nameplate current, service factor, and start duration into a preliminary setting and trip class.
Result: a JRC1-D09, three-pole, with a 220 V AC coil, plus an overload relay. The selection was derived from the load, not from a catalogue.
The same procedure applies at higher power. An 18.5 kW motor at 400 V works out to roughly 35 A full-load current and requires a contactor with an AC-3 rating above that figure.
Use This Seven-Step AC Contactor Selection Process
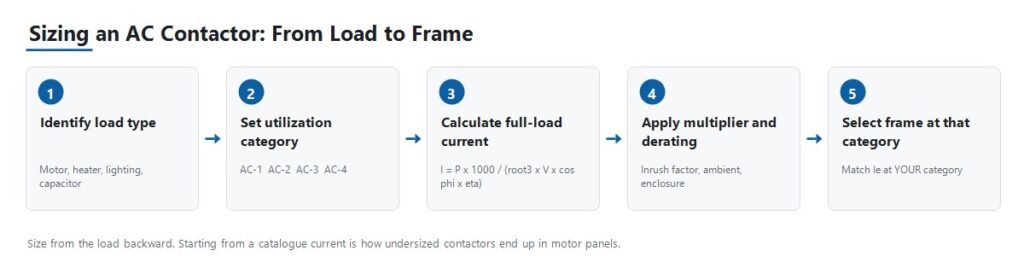
Step 1: Identify the Load Type and Utilization Category
Establish whether the load is resistive, a standard squirrel-cage motor, a wound-rotor motor starting under load, or a motor subject to jogging and reversing. Everything downstream depends on this answer, because it determines which of the contactor’s several current ratings actually applies.
Step 2: Calculate Operational Current and Confirm Voltage
Use the formulas above to obtain full-load current, apply the relevant load-type multiplier, then confirm that the contactor’s rated operational current Ie at your utilization category covers it with margin. Match the rated operational voltage Ue to the system line voltage.
Step 3: Select Coil Voltage
Coil voltage is a separate specification from load voltage. A 380 V motor circuit may be switched by a 24 V DC or 220 V AC coil depending on the control architecture. Confirm what the control circuit actually supplies, whether that is a PLC output, a control transformer secondary, or a DC control supply, before ordering.
Step 4: Choose Pole Count and Configuration
Three-pole is standard for three-phase motor loads. Four-pole is used where neutral switching or an additional independent circuit is required. Confirm the arrangement against the system earthing design, since neutral switching is required in some systems and unnecessary or prohibited in others.
Step 5: Specify Auxiliary Contacts
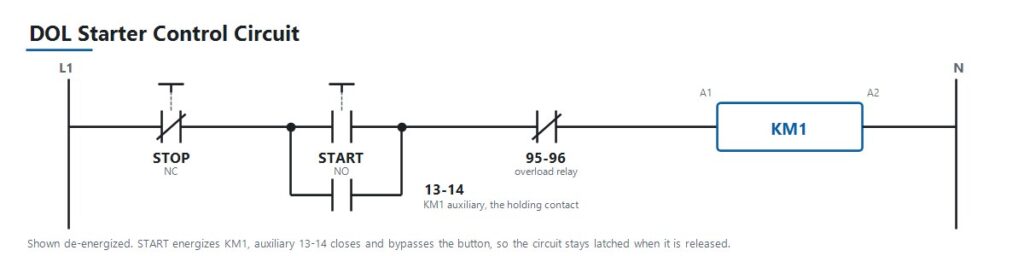
Determine how many normally open and normally closed auxiliary contacts are needed for interlocking, PLC status feedback, and indicator lamps, and whether they are integral or added as a separate auxiliary block. In a standard direct-on-line starter, an auxiliary contact wired in parallel with the start button is what latches the control circuit so the contactor stays energized after the operator releases the button. Auxiliary contacts are inexpensive to specify at design stage and awkward to retrofit afterwards.
Step 6: Check Electrical Life Against Actual Duty Cycle
For frequently cycling applications such as jogging, reversing, or high-frequency automation sequences, check the rated operations per hour and the electrical life at your utilization category. Mechanical life, measured without load, is always the higher and less relevant figure.
Step 7: Coordinate with Upstream Protection
Pair the contactor with a correctly sized overload relay for motor loads, then coordinate with an upstream breaker or fuse sized for short-circuit protection. On larger distribution boards that upstream device is often an air circuit breaker. Contactor selection is one link in a chain that runs from load current, to breaker rating, to prospective fault current, to device breaking duty. Getting the contactor right while leaving that chain unverified simply relocates the problem.
IEC 60947-4-1 and NEMA Ratings Are Not Interchangeable Labels
AC contactors sold internationally are generally built to IEC 60947-4-1, which defines the utilization categories and the rating structure used throughout this guide. The current fifth edition was published in 2023 and supersedes the 2018 edition. It is worth checking which edition a project specification references, because they are not identical.
North American markets commonly reference NEMA ICS 2 contactor ratings instead of, or alongside, IEC utilization categories. The two systems classify contactors differently, since NEMA uses size classes rather than AC-1 through AC-4. A specification written for one market does not translate automatically to the other. When sourcing for a North American project, confirm which framework the buyer’s specification actually requires before quoting a part.
Treat the product standard, the installation code, and any market-specific requirement as three separate questions. Confirming one does not answer the others.
Type 1 and Type 2 Coordination
Short-circuit coordination under IEC 60947-4-1 determines how much damage a fault causes to the contactor and starter. Type 1 permits damage to the equipment after a short-circuit fault, provided the damage is contained and no hazard results, and the equipment may require repair or replacement. Type 2 requires that the equipment remains suitable for further use, with only light contact welding permitted. These are different commercial and engineering outcomes. Confirm which one the project specification requires before selecting the combination.
Choosing Between the JUTRION JRC1 Ratings
JUTRION manufactures the JRC1 series AC contactor on its own production lines in Wenzhou, Zhejiang, built to IEC 60947-4-1. Coil voltage options include 24 V, 48 V, 110 V, 220 V, and 380 to 415 V at 50 or 60 Hz. Every unit is tested for mechanical operation, coil performance, and electrical switching before shipment.
The following are published rating points across the four utilization categories. Read the table by category rather than by model, since the same frame appears under more than one category with a different rating.
| ประเภท | Rating point | Duty this represents |
|---|---|---|
| AC-1 | JRC1-D09, 20 A | Resistive heaters, HVAC heating banks, general lighting |
| AC-2 | JRC1-D25, 25 A | Wound-rotor motors starting under load, cranes and hoists |
| AC-3 | JRC1-D09, 9 A | Squirrel-cage motors, normal start and stop, pumps and fans |
| AC-4 | JRC1-D18, 7.7 A | Jogging, plugging, rapid reversing, elevators and conveyors |
The JRC1-D09 appears twice, at 20 A under AC-1 and 9 A under AC-3, because those are two ratings of the same physical contactor under two different duties. For a standard induction-motor circuit, which covers the majority of pump, fan, and compressor applications, size against the AC-3 rating as shown in the worked example. For jogging or reversing duty, size against AC-4 instead, where the same frame carries substantially less current.
Frame ratings above these published points are available. Final model selection should be based on the model-specific ratings and project conditions, not on a current figure alone.
Apply the Selection Logic to Five Panel Scenarios
Standard Motor Panel for Pumps, Fans, and Compressors
An OEM building control panels for HVAC or water-treatment equipment specifies contactors for straightforward motor start and stop duty. This is category AC-3. Size the AC-3 rating against the calculated full-load current, pair it with a correctly sized overload relay, and match the coil voltage to the panel’s control transformer output.
Crane or Hoist Panel with Wound-Rotor Motors
A crane OEM requires contactors that handle high-torque starting and plugging duty on wound-rotor motors, which is category AC-2. These loads are harder on the contacts than standard AC-3 duty because of repeated starting under load and reversing. Undersizing here appears as premature contact wear rather than immediate failure, which makes it easy to misdiagnose as a quality problem.
Elevator or Conveyor Control with Jogging and Reversing
A machine builder needs contactors for an application with frequent direction reversal and inching moves, which is category AC-4, the most demanding of the four. Electrical life at the actual operations-per-hour rate matters more here than in any other scenario. Undersizing this category is the fastest way to consume a contactor’s rated life.
Capacitor Bank Switching for Power Factor Correction
A facility adding power-factor-correction capacitors needs contactors sized against capacitive inrush, conventionally about 1.5 times capacitor rated current, and frequently specified with pre-charging resistors or as dedicated capacitor-switching contactors. Standard AC-1 sizing is not adequate, because capacitive inrush is a distinct switching duty rather than a mild version of resistive duty.
Resistive Heating or Lighting Panel
A panel builder switching HVAC heating banks or large lighting loads is working in category AC-1, the least demanding, since there is no significant inrush or inductive kick to manage. Discharge and HID lighting are the exception and require the 1.1 to 1.4 multiplier for ballast inrush. This is also the case where buyers sometimes over-specify by choosing an AC-3-rated part where AC-1 would serve, which is not unsafe, only unnecessary cost.
Avoid the Nine Mistakes That Cause Early Contactor Failure
| Mistake | Consequence | Prevention |
|---|---|---|
| Sizing against the AC-1 rating for a motor load | Contactor undersized for its real duty, contacts weld or wear out early | Always size against the rating for the actual utilization category |
| Omitting the overload relay | Motor and contactor both exposed to sustained overcurrent | Pair every motor circuit with a correctly sized overload relay |
| Ignoring switching frequency against electrical life | A correctly current-sized contactor still fails early in high-cycle duty | Check rated operations per hour and electrical life at your category |
| Mismatched coil voltage | Contactor fails to pull in, or the coil burns out | Confirm against the actual control-circuit voltage, not the load voltage |
| No upstream coordination check | A short-circuit fault destroys the contactor unnecessarily | Verify Type 1 or Type 2 coordination before finalizing the design |
| Reversing contactors without interlocking | Both contactors can close together, creating a phase-to-phase short | Specify both mechanical and electrical interlocking on reversing pairs |
| Ignoring ambient temperature and enclosure derating | Shortened life despite every other specification being correct | Derate using the product curve and the enclosure temperature |
| Forgetting the load-type multiplier | Capacitor, transformer, or lighting inrush degrades contacts over time | Apply the conventional multiplier for the load type |
| Specifying auxiliary contacts too late | Costly panel rework or awkward add-on blocks | Determine interlocking and feedback needs at design stage |
Install, Commission, and Diagnose the Contactor
Most contactor faults reported as product defects are symptoms of a sizing, coordination, or control-supply problem. The table below maps the common symptoms to the checks that identify the cause.
| Symptom | Possible causes | Useful checks |
|---|---|---|
| Chatters or hums loudly | Low or unstable coil voltage, worn shading coil, dirty or loose magnetic core | Measure coil voltage under load, inspect the core face, verify control supply stability |
| Contacts welded shut | Undersized for the actual category, short-circuit event without adequate coordination, excessive switching frequency | Verify category sizing, review upstream fault history, compare operations per hour against rated electrical life |
| No pickup although the control signal is present | Open-circuit coil, wrong coil voltage, mechanical binding, blown control fuse | Measure coil resistance and voltage at the terminals, check the control fuse, inspect for obstruction |
| Contacts pitted or burned | Normal end-of-life wear, undersized for duty category, poor arc suppression at high switching frequency | Compare condition against rated electrical life, re-verify category sizing, inspect the arc chute |
| Auxiliary feedback disagrees with the main contact state | Worn or misaligned auxiliary block, mechanical linkage wear | Test auxiliary continuity independently, inspect the linkage to the main contact assembly |
| Terminals overheating | Loose termination, undersized conductor, incorrect torque at installation | Check terminal torque against specification, verify conductor sizing, thermal-image under load |
| Coil burns out repeatedly | Sustained overvoltage on the control circuit, excessive ambient temperature, mechanical binding preventing full pull-in | Measure control voltage under all operating conditions, check for binding, verify ambient temperature |
Repeated early failures in the same application almost always indicate a sizing, coordination, or duty-cycle mismatch rather than a defective batch. Diagnose the cause before re-ordering the same part number.
Protect the Coil and Whatever Drives It
การตัดพลังงานให้กับขดลวดเหนี่ยวนำทำให้เกิดแรงดันทรานเซียนต์ เมื่อเอาต์พุตทรานซิสเตอร์ของ PLC รีเลย์อินเทอร์โพสซิ่งขนาดเล็ก หรือตัวควบคุมอิเล็กทรอนิกส์สวิตช์ขดลวดนั้นโดยตรง ทรานเซียนต์จะเดินทางย้อนกลับเข้าไปในอุปกรณ์นั้น นี่เป็นสาเหตุที่พบบ่อยของความล้มเหลวของเอาต์พุต PLC และหน้าสัมผัสสึกกร่อนบนรีเลย์อินเทอร์โพสซิ่ง และสามารถออกแบบป้องกันได้โดยตรง ใช้ RC สนับเบอร์คร่อมขดลวด AC และใช้ฟลายแบ็กไดโอดหรือวาริสเตอร์กับขดลวด DC โปรดสังเกตข้อแลกเปลี่ยน: ฟลายแบ็กไดโอดแบบธรรมดาทำให้เวลาปลดปล่อยยาวขึ้นอย่างเห็นได้ชัด ซึ่งมีความสำคัญเมื่อคอนแทกเตอร์เป็นส่วนหนึ่งของฟังก์ชันหยุดที่เกี่ยวข้องกับความปลอดภัยซึ่งมีเวลาตอบสนองที่กำหนดไว้.
ยืนยันพิกัดความทนแรงดันใช้งานของขดลวด แทนที่จะสมมติว่าค่าพิกัดระบุนั้นถูกต้อง สายควบคุมที่ยาวหรือหม้อแปลงควบคุมขนาดเล็กเกินไปอาจทำให้แรงดันจริงที่ขดลวดต่ำกว่าช่วงที่ขดลวดจะดูดเข้าและค้างไว้ได้ และอาการจะปรากฏเป็นการสั่นกระพือมากกว่าจะเป็นความผิดปกติของสายไฟที่ชัดเจน.
ระบุพารามิเตอร์เหล่านี้เมื่อขอใบเสนอราคา
การสอบถามเกี่ยวกับคอนแทกเตอร์ที่มีข้อมูลต่อไปนี้สามารถตอบกลับด้วยรุ่นเฉพาะได้ในการตอบครั้งแรก การสอบถามที่ให้เพียงค่าแอมแปร์มักต้องมีการสอบถามเพิ่มเติมหลายรอบ เนื่องจากค่ากระแสเพียงอย่างเดียวไม่สามารถระบุลักษณะงานที่ใช้ได้.
- การใช้งานหรืออุปกรณ์ที่ถูกควบคุม
- ประเภทโหลด: มอเตอร์ ฮีตเตอร์ ไฟแสงสว่าง คาปาซิเตอร์ หรือหม้อแปลง
- ประเภทการใช้งาน หากทราบแล้ว
- กำลังพิกัดมอเตอร์เป็นกิโลวัตต์ หรือโหลดเป็นกิโลวัตต์
- แรงดันระบบและความถี่
- กระแสโหลดเต็มพิกัดที่คำนวณได้
- ลักษณะงาน: จำนวนสตาร์ตต่อชั่วโมง และการใช้งานมีการกลับทางหรือจ็อกหรือไม่
- แรงดันขดลวดที่ต้องการ และเป็น AC หรือ DC
- จำนวนขั้ว สามขั้วหรือสี่ขั้ว
- หน้าสัมผัสช่วยที่ต้องการ ปกติเปิดและปกติปิด
- อุปกรณ์ป้องกันด้านต้นทาง เบรกเกอร์หรือฟิวส์
- อุณหภูมิแวดล้อมภายในตู้
- วิธีการติดตั้ง ราง DIN หรือสกรู
- ปริมาณสั่งซื้อและตลาดปลายทาง
- ข้อกำหนด OEM หรือ ODM ใดๆ
คำถามที่พบบ่อย
ความแตกต่างระหว่างคอนแทกเตอร์ AC กับมอเตอร์สตาร์ตเตอร์คืออะไร?
มอเตอร์สตาร์ตเตอร์คือคอนแทกเตอร์ที่รวมกับโอเวอร์โหลดรีเลย์ในชุดประกอบเดียว บรรจุเฉพาะสำหรับวงจรมอเตอร์ คอนแทกเตอร์แบบเดี่ยวให้ฟังก์ชันการสวิตช์เท่านั้น และการป้องกันโอเวอร์โหลดจะเพิ่มแยกต่างหาก.
คอนแทกเตอร์ตัวเดียวใช้กับโหลด AC-1 และ AC-3 ได้หรือไม่?
คอนแทกเตอร์ตัวเดียวกันมักมีพิกัดสำหรับหลายประเภท แต่มีพิกัดกระแสต่างกันในแต่ละประเภท เลือกขนาดตามพิกัดที่ตรงกับประเภทการใช้งานของโหลดจริง ไม่ใช่ตัวเลขสูงสุดบนฉลาก.
คำนวณกระแสสำหรับการเลือกขนาดคอนแทกเตอร์อย่างไร?
สำหรับมอเตอร์สามเฟส ใช้ I = P × 1,000 / (√3 × VLL × cos φ × η) โดยที่ P คือกำลังพิกัดเป็นกิโลวัตต์ VLL คือแรงดันระหว่างเฟส cos φ คือตัวประกอบกำลัง และ η คือประสิทธิภาพ จากนั้นใช้ตัวคูณตามประเภทโหลดและยืนยันผลลัพธ์กับพิกัดของคอนแทกเตอร์ที่ประเภทการใช้งานของคุณ.
คอนแทกเตอร์ขนาดใหญ่กว่าจะปลอดภัยกว่าเสมอหรือไม่?
ไม่ การเลือกขนาดใหญ่เกินทำให้สิ้นเปลืองต้นทุนและพื้นที่ตู้ และในโหลดบางประเภท หน้าสัมผัสของคอนแทกเตอร์ขนาดใหญ่เกินไปมีกระแสไหลผ่านน้อยเกินไปจนไม่สามารถรักษาความสะอาดได้ เลือกขนาดโดยมีส่วนเผื่อที่สมเหตุสมผลเหนือกระแสโหลดเต็มพิกัดที่คำนวณได้ในประเภทที่ถูกต้อง แทนที่จะข้ามขนาดเฟรมไปสองระดับ.
ควรเลือกแรงดันขดลวดเท่าใด?
เลือกให้ตรงกับสิ่งที่วงจรควบคุมจ่ายจริง ไม่ว่าจะเป็นเอาต์พุต PLC ขดลวดทุติยภูมิของหม้อแปลงควบคุม หรือแหล่งจ่าย DC ของตู้ ไม่ใช่แรงดันด้านโหลดที่คอนแทกเตอร์สวิตช์.
ทำไมคอนแทกเตอร์ของฉันจึงมีเสียงฮัมหรือสั่นกระพือ?
สาเหตุที่พบบ่อยคือแรงดันคอยล์ต่ำ ไม่เสถียร หรือไม่ถูกต้อง หรือหน้าขั้วแม่เหล็กสึกหรอหรือสกปรกบนชุดคอยล์ AC วัดแรงดันคอยล์ภายใต้สภาวะโหลดจริงและตรวจสอบหน้าขั้วแม่เหล็กก่อนสรุปว่าอุปกรณ์เสีย.
ฉันยังจำเป็นต้องใช้โอเวอร์โหลดรีเลย์หรือไม่หากใช้คอนแทคเตอร์อยู่แล้ว?
จำเป็น สำหรับวงจรมอเตอร์ คอนแทคเตอร์ตัดต่อตามคำสั่งแต่ไม่ตัดวงจรเมื่อมีกระแสเกินต่อเนื่อง ซึ่งเป็นหน้าที่ของโอเวอร์โหลดรีเลย์ อุปกรณ์ทั้งสองทำงานร่วมกันและไม่สามารถใช้แทนกันได้.
คอนแทคเตอร์รองรับรอบการสวิตชิ่งได้กี่ครั้ง?
ขึ้นอยู่กับขนาดเฟรมและที่สำคัญกว่านั้นคือประเภทการใช้งานและระดับกระแสที่ทำงาน อายุการใช้งานเชิงกลที่วัดโดยไม่มีโหลดมักสูงกว่าอายุการใช้งานทางไฟฟ้าภายใต้โหลดมาก และอายุการใช้งานทางไฟฟ้าจะลดลงอีกเมื่อความถี่ในการสวิตชิ่งสูงขึ้น ตรวจสอบอายุการใช้งานทางไฟฟ้าที่กำหนดที่รอบการทำงานจริง.
สามารถต่อคอนแทคเตอร์สองตัวแบบขนานเพื่อแบ่งกระแสได้หรือไม่?
โดยทั่วไปไม่แนะนำสำหรับการสวิตชิ่งโหลดหลัก หน้าสัมผัสไม่เคยปิดพร้อมกันพอดี ดังนั้นอุปกรณ์ตัวหนึ่งจะรับกระแสเมคกิ้งเต็มจำนวน ใช้คอนแทคเตอร์ตัวเดียวที่มีขนาดถูกต้องแทน.
ความแตกต่างระหว่างการประสานงานแบบ Type 1 และ Type 2 คืออะไร?
ตามมาตรฐาน IEC 60947-4-1 Type 1 อนุญาตให้คอนแทคเตอร์และสตาร์ทเตอร์เสียหายได้หลังจากเกิดความผิดพร่องลัดวงจร โดยความเสียหายต้องถูกจำกัดและไม่ก่อให้เกิดอันตราย Type 2 กำหนดให้อุปกรณ์ยังคงเหมาะสำหรับการใช้งานต่อไป โดยอนุญาตให้มีการเชื่อมติดของหน้าสัมผัสเพียงเล็กน้อยเท่านั้น ตรวจสอบว่าข้อกำหนดของโครงการต้องการแบบใด.
ฉันจำเป็นต้องลดพิกัดคอนแทคเตอร์สำหรับอุณหภูมิแวดล้อมสูงหรือไม่?
จำเป็น กระแสพิกัดอ้างอิงจากอุณหภูมิแวดล้อมตามเอกสารข้อมูล เมื่ออุณหภูมิสูงกว่านั้น ความสามารถในการรับกระแสจะลดลง ใช้กราฟลดพิกัดของผู้ผลิตและอ้างอิงจากอุณหภูมิภายในตู้แทนอุณหภูมิห้อง.
ฉันจะทดสอบคอนแทคเตอร์ AC ด้วยมัลติมิเตอร์ได้อย่างไร?
เมื่อวงจรถูกแยกและล็อกไว้ วัดความต้านทานคอยล์ระหว่าง A1 และ A2 วงจรเปิดหรือค่าที่อ่านได้ใกล้ศูนย์บ่งชี้ว่าคอยล์เสีย จากนั้นตรวจสอบความต่อเนื่องของขั้วหลักแต่ละขั้ว ซึ่งควรอ่านค่าเปิดเมื่อไม่จ่ายไฟและปิดเมื่อกดคอนแทคเตอร์ด้วยมือ เปรียบเทียบทั้งสามขั้ว เนื่องจากขั้วหนึ่งที่อ่านค่าแตกต่างอย่างเห็นได้ชัดบ่งชี้ถึงความเสียหายของหน้าสัมผัสที่ขั้วนั้น.
เลือกขนาดจากโหลด ไม่ใช่จากแคตตาล็อก
การเลือกคอนแทคเตอร์ที่เชื่อถือได้มาจากสิ่งที่การใช้งานต้องการและทำงานไปข้างหน้าสู่หมายเลขรุ่น การเริ่มจากขนาดเฟรมที่มีอยู่และหวังว่ารอบการทำงานจะพอดีคือวิธีที่คอนแทคเตอร์ขนาดเล็กเกินไปไปอยู่ในตู้มอเตอร์.
ลำดับการปฏิบัติตรงไปตรงมา: กำหนดโหลดและประเภทการใช้งาน คำนวณกระแสโหลดเต็มพิกัด ใช้ตัวคูณประเภทโหลดและการลดพิกัดจากอุณหภูมิแวดล้อม จากนั้นตรวจสอบกระแสการทำงานพิกัดของคอนแทคเตอร์ที่ประเภทนั้น หลังจากตัวเลขแอมแปร์ถูกกำหนดแล้วเท่านั้น การตรวจสอบขั้ว คอยล์ หน้าสัมผัสเสริม อายุการใช้งานทางไฟฟ้า และการประสานงานการลัดวงจรจึงจะทำให้ข้อกำหนดสมบูรณ์.
เมื่อข้อมูลเหล่านั้นได้รับการยืนยันแล้ว เปรียบเทียบกับรูปแบบที่มีอยู่ใน กลุ่มผลิตภัณฑ์คอนแทคเตอร์ AC JUTRION. Final model selection should follow the model-specific ratings and the project conditions, not the current figure alone.
